Showing posts with label Gecado. Show all posts

Tuesday, May 18, 2010

Cleaning Up A Thrashed Diana Model 5 Pistol End Cap

Well I haven't entirely given up on the Diana/Gecado 5 as I do have a thrashed action I can rehab to fit.

The end cap was beat up so I decided to try cleaning it up.

First I chucked up some aluminum.

I turned some steps, only the front one matters although the other ones will be used to true it in the chuck if I need to use it again.

Setting the threading tool.

Interestingly enough, the thread seems to be 24 tpi, not metric.

Cap screws on.

I filed the radius and faced the front.

You can see it's a trifle messed up.

I removed a little bit at a time.

Until it was clean.

I then knurled it. I had to adjust the rollers again to get a full depth knurl. If I do it again I'll order slightly finer knurls as these were pretty coarse.

Not bad?

A little abrasive brushing removed the burs and such.

Monday, May 10, 2010

Gecado Diana Model 5 Pistol, Fail Whale

Ahh, the day started with such promise.

I found a ball to fit the spring plunger for the trigger adjustment screw.

.125" diameter.

Fits and works.
Then I put the rest of the pistol back together in reverse order of disassembly.

Then I noticed that the spot welds on the front half of the trigger/cocking shoe stamping were all broken.

Both sides, lucky me.
Not sure how that happened. I didn't put any force on that assembly beyond clamping it in the spring compressor, and since I've done that to several other similar diana pistols I don't think that was it. Could just be that the spot welds weren't as strong on this earlier Diana postwar pistols. It could have been caused by someone before me trying to cock the stuck piston repeatedly, or by holding it in a vise by the stamping and unscrewing the end cap. But that's just guessing. In any case I need to dig out some spot welding gear, make some special tongs that extend into the tube, etc. Doubt I'll get to that any time soon...we'll see. Derrick says the pistol is my "White Whale".

I do happen to have another Diana 5 action of later vintage that's missing some parts so it may get put in place of this one.

Monday, May 3, 2010

Gecado Diana Model 5 Pistol, Fixing The Piston Head

Now to deal with that messed up piston head.

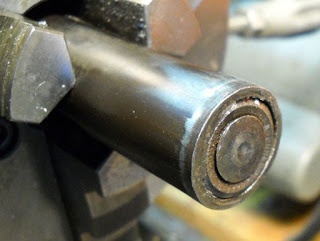
I chucked it in the 3 jaw. You can see the folded over burrs that are keeping the loose head in.

I turned away a couple of thou' at a time. I wanted to remove the minimum.

Then when I had a nice clean ring on the face I started working on the inside rim.

At this point I was able to pop the head out. Those burrs were thick.
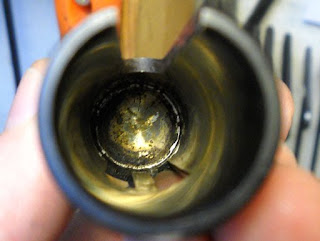
The head...

The back side. As you can see it's a rivet of some sort that retained the original seal.

Dialing in the piston in the 4 jaw chuck.

Boring the recess true and clean.

Ready for a head.

The insert roughed out.

Using a form cutter to make the dovetail button. Notice the chatter marks.

Final cutting, chatter removed at very low speed.

You can see the tool I ground. The Diana pistons seem to have a 70 degree dovetail as best I can measure.

Cutting the insert off.

The insert.

Fits!

I soldered it in with soft solder. The new acetylene tank did not catch on fire like the old one did last time. A nice even ring of solder holding the insert in. I cleaned the face up with a very fine pass across the face.

You can see the solder flowed inside.

Using my extremely handy Diana seal tool.

Popping the seal on. Notice I cleaned up the OD near the head as it was a bit scored.

The seal in place. Looks good.

Another shot. I bought the seal from Air Rifle Headquarters. He gets a lot of my money these days.

Now to derust, deburr, clean, reblue the pistol, make breech seal (o-ring) shims, lube and reassemble...then test. Then if it works... fix the cap that screws on the end...all the ones I have are beat up and I should make a threaded arbor so I can reknurl/cut new knurls after truing. fix the stock... fix the windage screw... I'll never run out of projects.

Saturday, May 1, 2010

Gecado Diana Model 5 Pistol Disassembly, Part 2

On I go.

Pushed this pin out.

Came out easily.

Removing the pivot bolt lock screw.

Barrel and breech removed.

Lack of a breech seal...need to make one.

That rivet looks like it won't come out, being flared out at the ends.

But it pushed out easily.

Trigger & spring.

Cocking transfer bar slides forward, up and out.

Trigger pull screw on the right, lock screw on the left.

Mist be missing the plunger/ball on the end?

Disassembled.

Lock screw removed.

The end cap lock screw was missing.

Cap unscrewed.

Just like the other Diana 5.

The piston was stuck so I resorted to this insane solution, my home made slide hammer vise grips holding a bent hook tool...

Which gripped the inside of the piston slot.

Braced in the vise with a piece of brass rod through the pivot holes.

The piston was pulled out.

Unlike any other Diana piston head.

And the head is loose...If anyone has taken apart a similar Diana and has a picture of a good condition piston head like this I'd love to see it. As is I'll probably whip up a replacement dovetailed head that matches the later 5 and solder it in.

You can see the step inside the piston that the head butts up against.

Now to get to work fixing the problems and getting it to shoot.