Model 61

Almost immediately, I removed the rear open sight and scrounged up an old Beeman sport aperture. Added an adjustable iris from Merit, as well.

The factory issue front sight is a hooded target-style affair. In theory, it has replaceable inserts, but the new gun didn't come with any spares and I've yet to see any offered as aftermarket. I vaguely recall reading a review of the IZH 60 (the first model--it was a single shot) some years ago and inserts were mentioned as coming with the gun. Apparently, not anymore.

Unscrewing the plastic muzzle cap reveals M12 x 1mm threading on the end of barrel.

The post insert and hood slide right off. Knurling on the angle at the base of the threads holds the sight from turning.

On the range, the Beeman aperture sight really tightened up the groups, but the shots were hitting just slightly high--and I was out of rear sight adjustment. I looked around and found a spare Weihrauch front sight from an old R1 with several various target inserts. Maybe I could retrofit the HW sight to the IZH, solve my elevation problem, and add a few more ounces to the muzzle all at the same time? A glorified muzzle adapter was in the works.

Chopped about 4.75" of 0.750" drill rod.

Faced both ends in the 3-jaw chuck, then re-mounted it into the 4-jaw (better grip and more accurate) and and dialed it to 0.001" of runout. Good enough for me.

Spotted the end with a center drill.

Drilled through with successively larger bits. First task: make a hole big enough to shoot through. A 0.250" hole from end to end will suffice for a 0.177 cal pellet. Next, I used a 27/64" bit and drilled a hole 2" deep into one end. This brought the hole diameter to about 0.423". I mounted a boring bar and bored the hole slightly larger to 0.433". This equates to 11 millimeters--my tapping hole size to match the muzzle threading.

Chucked a M12 x 1mm tap and started cutting threads.

Got just less than halfway into the hole and couldn't turn the chuck jaws anymore. Not enough leverage--and the tap was slipping in the Jacob's chuck.

I left the M12 tap in place and very carefully removed the 4-jaw from the lathe's headstock. A while back, I made the black cube on the left. It's just a machined chunk of steel with a grade 8 (hardened) 3/4"-16 thread attached. The thread screws into the back of the Taig chuck and the cube becomes a set of wrench flats.

The thread is precisely squared to the top so the chuck bottoms evenly.

Grab the adapter with rubber jaws in a vise, attach a handle to the M12 tap and get back to threading.

A quick shot of that 27/64" bit. Long story short; the bit didn't fit the 3/8" Jacobs chuck. Had to cut about 2" off the bit (Dremel tool and a cut-off wheel), re-point and sharpen the bit, shave down the shaft diameter to 3/8". It's amazing that anything tangible ever gets finished.

If you look back at the IZH 61's muzzle pic above, you'll note both the gap at the end of the M12 thread as well as the angle that transitions to the barrel's full 0.515" diameter. For the adapter to fit properly, I again used the boring bar to shave out the end of the freshly cut threads to a depth of 0.272". This was just a bit greater than the distance from full barrel diameter to the first thread.

Upgraded the steady rest to use sealed cartridge bearings. The bearings now spin directly against the workpiece instead of the original static brass supports. Faster speeds and less workpiece scoring result. And more cool tools.

The compound slide was installed to cut a taper on the rear of the adapter. Just eyeballed an angle. Used some Dykem layout fluid and sketched some reference lines as an arbitrary boundary line. Could've used a Crayola.

After finishing the angle, I mounted a cut-off tool. Needed to make the rear part into a locknut. Set the blade to cut just over 0.595" from the end. Removed the entire taper with about 6 M12 internal threads and the 0.272" relief cut.

This small piece will become a locknut. Could have made this in 2 pieces from the start, but I wanted to maintain alignment. It's easier to keep everything on center when it's worked as one piece.

Faced the end and cleaned up the threading. Decided it was going to be longer than necessary by an inch. Cut it down (from the unthreaded end) and refaced.

Went through my bicycle cone wrenches (hey, you gotta have a hobby) and settled on a Park SCW-14. More layout fluid on the end and the jaws got traced onto the part.
What happened? No images? Sorry. I milled the flats for the wrench to 14mm.

More layout fluid. Measured the HW front sight dovetails. Marked the top edge references into the end of the adapter. Mounted the adapter into the milling adapter and reconfigured the vise.

Set up a small 60 degree dovetail cutter. All cuts were vertical. A stop block under the vertical slide made the cuts the exact same length on each side. Nick warned me that the dovetail cutters were fragile things--he wasn't kidding. My learning curve is often expensive.

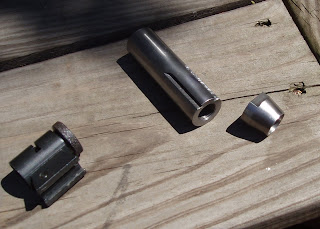
Still in the raw. Left to right: A standard HW front sight, the "adapter" base to attach said sight to the end of a IZH 61 and a tapered locknut. It's still not right.

The adapter went back to the 4-jaw. Shaved the muzzle end to 0.495". Went back with a different tool and removed the angled shoulder.

No need to reinvent the wheel as we keep saying. Attached the die holder and threaded the end of the adapter to 1/2" x 28 tpi.

Needed the cube thing again.

Carefully removed the last 2 threads at the base.
Time to hit everything on a brass wire wheel and go to bluing.

Where'd that washer come from? When I shortened the adapter, I scavenged a sliver to turn into a washer. The locknut is shown threaded onto the barrel.

Locknut installed followed by the steel washer.

Weihrauch sight slides nicely onto the dovetail from back to front. More on that in a sec. Snugged down the clamping bolt.

The adapter is threaded to the gun, aligned (by eye for now) to the top of the barrel and the locknut is tightened forward against the adapter--thus locking it in place.
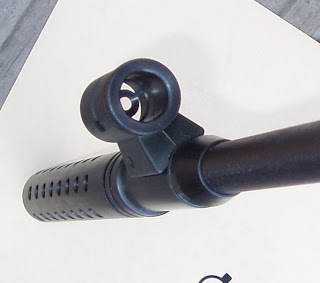
I mentioned not reinventing the wheel: there's too many cool looking and cheap AR-15, M-16, M-4, CAR-15, etc. muzzle brakes out there for me to bother making one. Just use the AR 1/2" x 28 thread standard and there you go.

I'll probably make a simple steel thread cover as well in the next few days. I mentioned intentionally cutting the dovetails with the opening facing rearward. Any sight movement induced by recoil will push the sight backward--where that steel washer now effectively acts as a positive stop.

A much nicer sighting picture--using inserts I can actually find.

Another view.

The rear sight is now almost dead center in it's elevation adjustment range. Accuracy is even better than before owing largely to the more precise sights as well as the increased muzzle steadiness. This particular brake (same as pictured here on the 2250 CAR project) is steel, providing that much needed weight. As the adapter is threaded, it's now a very simple matter to make or buy whatever additional weight is needed in the form of AR accessories.
At the forthcoming Pyramyd Airgun moving sale, I'll be hunting for a more elaborate rear sight. We'll see if anything comes up.
0 comments:
Post a Comment