Friday, April 30, 2010

Gecado Diana Model 5 Pistol Disassembly, Part 1

I couldn't pass up the offer of a beat up early (but post war) Gecado branded Diana 5 pistol.

Rusty. Notice the tapered barrel.

This is before Diana went with the ugly yet comfortable plastic grips/stock.

A sinister development, in that someone removed the thumb rest so it could be shot left handed. Not sure how or whether I'll fix that.

That's probably a crack.

The sights are different than the later Diana 5, and the windage screw is broken off and missing the adjustment nut.

Trigger guard, it all starts here.

Just as on the later Diana but different...

Action removed from the grip/stock.

The rear sight removed by unscrewing one screw and the elevation screw.

Different from the later model.

Hmm...how to take that apart, wiggle, wiggle.

Elevation screw & detent.

More disassembly.

The windage screw is part of the stamping and sheared off. That'll be fun to fix.

Different again from the later Diana and more adjustable.

Lower screw locks the spring adjuster.

Removing the lower screw first.

And teh spring comes out through the hole.

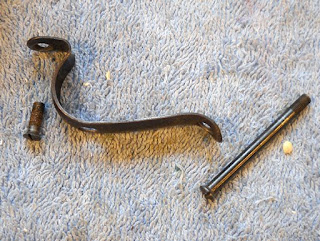
The parts. Bored yet?

Transfer bar thingamajig slides out. Just like all the postwar Diana pistols.

More to come...

Tuesday, April 27, 2010

Match Grips for a Daisy 7X7 Part 3 Final

With the palm shelf more or less attached to the right grip, and tired of sanding, I stained the left side grip and the shelf.

Used two coats of Varathane American Walnut.

Producing this.

Got out the Dasco Pro scratch awl and sharpened the tip.

Let the stippling begin. There are plenty of ways to texture the wood using punches or a Dremel tool. For whatever reason, I gravitate toward doing this the hard way.

tap, tap, tap.... It's a laborious process.

Left side done.

Finished up the sanding on the right grip and stained it.

Just need to stipple the right grip panel.

There's a lot more surface to stipple on this side.

A couple evenings after work while watching late night TV got the grips to this point.

I liked the look, but I'd missed the mark. After 50 or so shots, it was apparent that the palm shelf needed to adjust upward a bit more. I was slightly less than thrilled considering how much time I had into the project at this point. Felt kinda stupid. I should have shot the gun more after getting the shelf fitted--before staining and all the stippling. After thinking about it for a while, I thought there might be an easy fix.

I decided to make the shelf taller rather than make a completely new one . Cut an outline of the shelf from a piece of 1/4" walnut scrap--always looking for the best part of grain.

I was thinking that if I dress it up enough, maybe it won't be so bad.

Cut a sliver of thin maple.

For, uh, contrast. (or maybe height)

Sanded off the wood stain from the top of the shelf and went looking for the Gorilla Glue.

About four hours later in the clamps. Together (hopefully) forever.

Sanded and re-stained. Made every effort to not get walnut stain on the maple.

Success! Got the needed height and I like the added visual appeal of the spacer.


Nice burl to complement the left side. The height problem turned out to be a rather fortuitous mistake.

Well, these certainly beat the old plastic grips. I'm calling it on this one. Took 3 posts and a couple weeks of working here and there. I need a different project next that doesn't involve so much sawdust.

Sunday, April 25, 2010

Match Grips for a Daisy 7X7 Part 2

Still sanding along. Turned my attention to the left grip panel.

Need to create a thumb shelf and add some finger grooves. Held the grip in my right hand and roughly sketched some lines in about the right spot.

And sanded out the rest. There's that nice piece of grain.

The hard part here is shaping the rear of the grip as it curves toward the grip frame. Don't want to overdo it--as that will leave a hollow against the gun. Tracing the grip frame onto the panel and working to just shy of the line is the way to go.

Looks promising.

Thinning the top edge.

Adding the finger grooves. Again, located by mounting the grip to the gun and tracing my fingers.


A couple views.

Grips roughed to shape and screwed into place. Need a spacer the thickness of the grip frame to fill the gap at the bottom. The grip frame is 0.500" thick and I didn't have a piece of walnut that thin. Rather than sand, I took the easy way out and went back to Terry Lumber and had them plane a piece of a scrap walnut board down to half inch. And when I told Chad "half an inch" he dialed the machine to half an inch. I pulled out a caliper and miked the board. It was 0.4995" to 0.5000" over 6 or so inches. He didn't even look nervous as I measured it. The kid is good.

Just traced around the bottom of the grip frame.

Cut just inside the line. Sharp-eyed readers will note this is not the piece shown below. I didn't leave quite enough wood in the heel, making this a "prototype".

Spacer take two.

Just needs blended into the grips.

Cut and sanded the spacer to fit the left and right panels.

Close. I'll blend these together by sanding then stippling.

Affixed the spacer to the left grip panel via Gorilla Glue and clamps.

I want the glue to coat 100% of the surfaces and I want some squeeze out on all edges.

After the glue dried, I screwed the grips to the frame and sanded the bottom edges as one.

Getting there.

Back to the right panel and the final shaping. Enlarged and deepened the palm depression with a round burr. It's pretty sharp and left a decent finish that won't require much in the way of finish sanding. A dull burr would likely just rip the wood and add additional work.

Cut a palm shelf.

Cut the inside corners square, then sanded the outer edges and did some quick shaping.

Test fit.

Another view.

Easiest way to align everything was to leave it all attached. (It's just dust, it'll wipe or blow off.)
Drilled for the palm shelf bolts. I drilled through the shelf and into the right grip. Then removed the grip and finished the holes.

I pinned the first hole with a transfer punch so the grip wouldn't twist while drilling the second hole.

Marked the high and low spots for the adjustment slot and used a 4-flute center cutting endmill. Cut the wood like hot butter.

Counterbored the inside of the slot using a forstner bit.

This recessed track will hold square nuts that the shelf will bolt into.

Another test fit. It's finally coming together.

More soon.