Tuesday, February 28, 2012

The 22XX Takes a Brief Detour

Was gonna start making a rear sight for the 22XXwhateveryouwannacallit from the last post and I somehow got sidetracked.  Seemed that such a large pistol should produce a bit more oomph. 


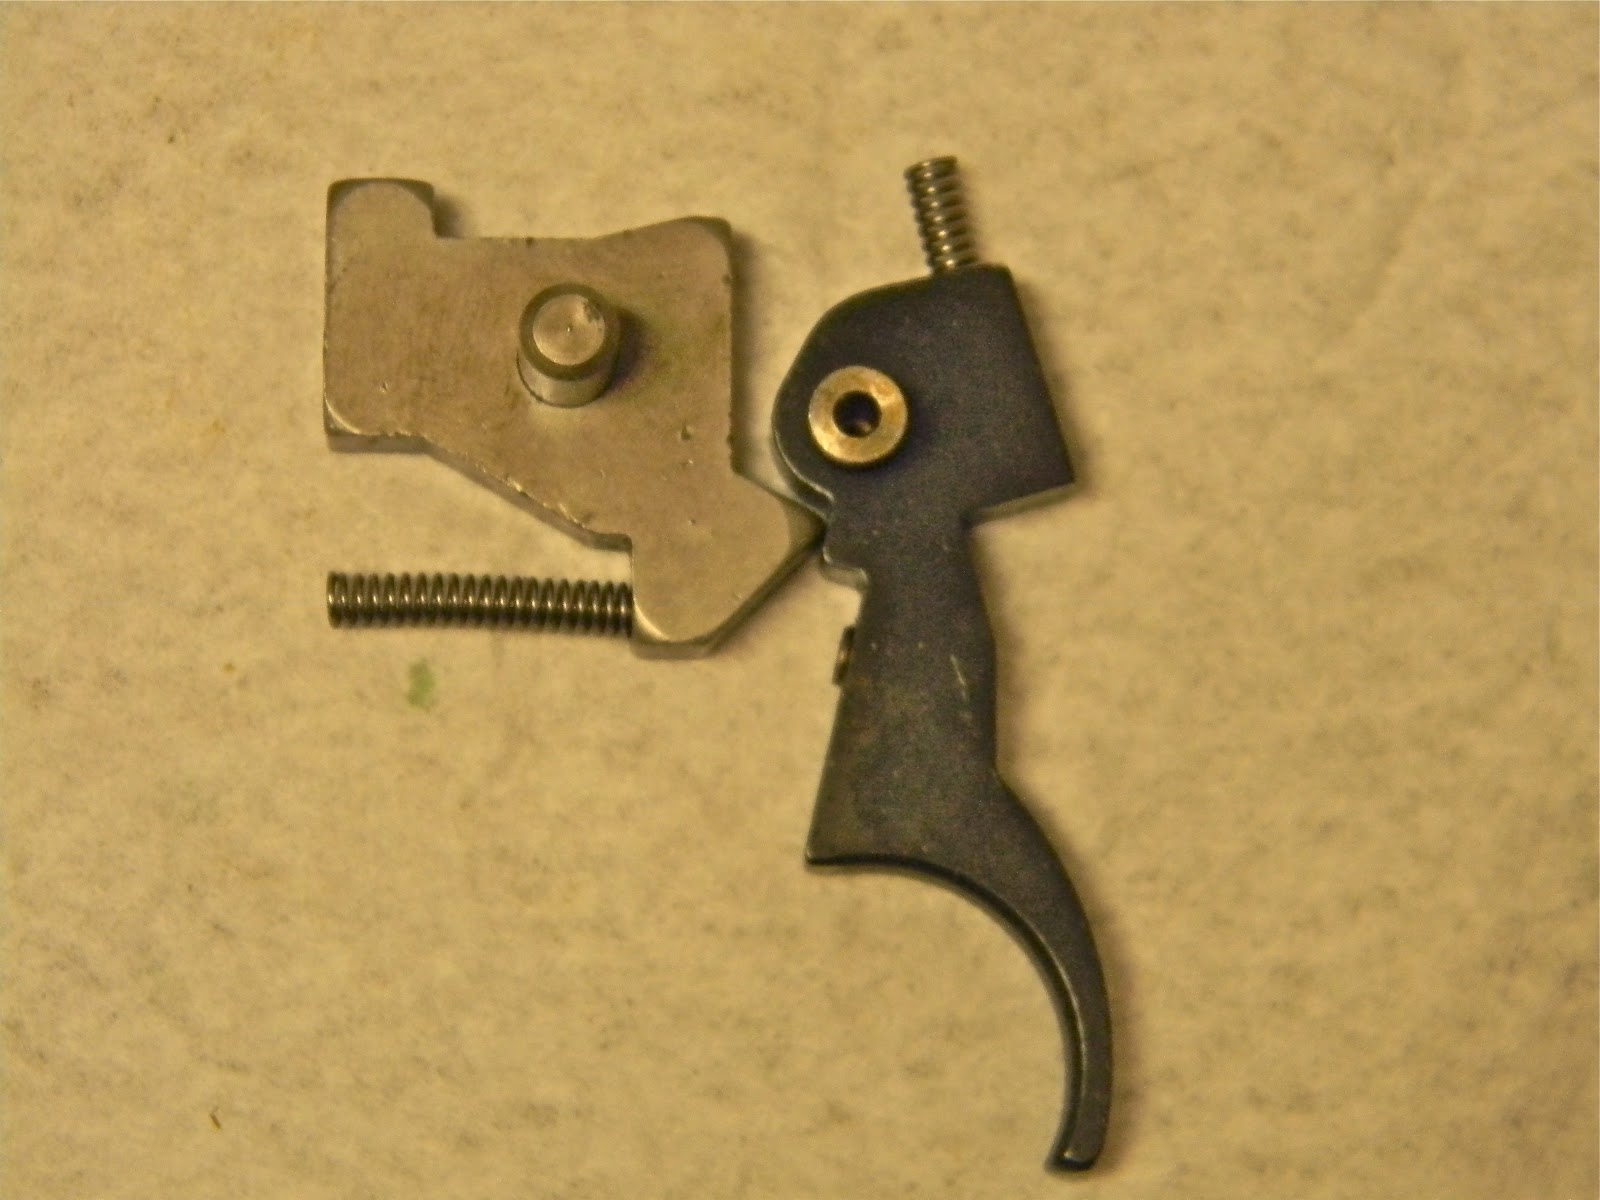
Started by cutting about a third of the threads off the front half of the valve.  An untouched half is on top...  This increases CO2 volume inside the valve.


A 1/4" diameter end mill was used next.


Again, this increases volume.  Obviously, the modified valve front is on the left.


Chucked a tiny ball mill in the Dremel.


This is the rear half of the valve.  Relieved the sharp ninety degree corner at the bottom of the transfer port.  The goal is to smooth out and radius the edge.


Cut a counter bore on top of the transfer port.


...and a similar counter bore in the breech end of the barrel.


Replaced the stock valve spring with something much softer.


Probably unnecessary, but the valve body threads got some teflon tape.


Since the valve gained so much additional volume, safety concerns dictate beefing up the valve securement in the gas tube.  Beats having the valve become a potential missile.  The red tape was used to help with layout for two additional valve screws.


I've done almost these very same steps during the AirSource project here.


Set-up was a bit different due to the use of the 2260 gas tube.  A jack screw held up the off end.


Spotted and drilled with a #29 drill bit, followed up with a 1/4" to counter bore for the screw heads.


Tapped the holes #8-32.


Turned down some #8-32 socket head cap screws to 0.248".


The socket heads stick out a wee bit.


Just enough to be too much.


Faced 'em down in the lathe and rounded the heads over with a file.  I'll blue these later.


With the counter bores cut for the transfer port, the stock transfer port tube was too short.  I cut and faced a short piece of 0.250" diameter brass tubing.


The initial idea was to use a small o-ring at each end of the tube to effect a seal.


Like so.


Tube gets sandwiched between the o-rings.  Well, it will once the breech is installed.  (There's one of the blued screws)


And here's the o-ring mate in the breech.  In practice, this didn't work very well.  Ended up changing from o-rings to thin discs cut from 0.250" diameter vinyl tubing.  The tubing was stiffer and didn't collapse as much as the o-rings.  Sorry, no pics of the vinyl.  Maybe later.


And here's where this whole experiment goes both right--and wrong. The gun hits 600 fps with a .22 cal RWS Hobby pellet--that's 150 fps faster than a stock 2240.  Some of the gain is no doubt simply due to the 13.5" barrel length--about 6" longer than a stock Crosman 2240.  The wrong part is the absurd usage of CO2.  The shot count went down to around 8 or 9 shots.  I forget exactly just how many because I was too busy changing cartridges to actually keep track.  Crosman can barely fill them as fast as this gun can empty them.  I can't live with the low shot count, so I've changed the front half of the valve and valve spring back to stock.  The gun with a slightly stiffer hammer spring is now putting out 550 fps and getting about 25+ decent shots before it drops below a useful (to me) velocity. 

More in a few days.

Thursday, February 23, 2012

Little Bit of Nothing Update

Put off making a post lately because I've done nothing new.  Been working on a Crosman 22XX build using a 2260 rifle gas tube.  Had to make a couple pieces parts, but nothing we haven't shown before.


Here's the assembled pistol.  I'd like to make a rear sight and lose the red dot on this one.


Was a pretty quick build.  Painted some stock 2240 grips with truck bed liner, had to make the bolt handle...


a rear cap for the gas tube...


added a trigger stop...


cut down a 2260 (.22cal) rifle barrel and crowned...   There was some other stuff like a new hammer spring, bolt hold open magnet, trigger job...  Nothing really out of the ordinary.


Cut these many months ago then promptly put them aside after I'd had a bad allergic reaction while working with a different piece of Bolivian rosewood for a knife handle.  These were cut from the remnants of the wood left over from the Crosman 150 grip project.  I had no issue working with that board, so, I'm unsure if I'm sensitized to rosewood in general--or if it was just an odd piece.  Hopefully, I'll be able to finish these, though I may do more carving rather than sanding to shape.

So, there's a rear sight project, probably a front sight to match, a breech, the grips...  I made a tentative project list the other day and there must have been two dozen projects on it.  We'll see what rises to the top.

Saturday, February 11, 2012

Quick Update on the Sterling

Dissatisfied with the 570 fps the Sterling was making, I tore the gun down yet again.


At least the compression tube can be disassmbled from the gun after removing only six bolts.


No damage to the face of the piston after over one hundred shots, so that's the good news.


No pics, but while I had the gun apart, I checked the bolt o-ring, but it was fine.  The next largest o-ring I had on hand didn't fit into the breech anyway.


Went through the box of mainsprings and found a similar spring that was about 0.750" longer.  Same OD, same ID.  I'll probably end up ordering a new higher quality spring from Air Rifle Headquarters.  The gun went back together and velocity increased to 600 fps for about twenty shots then dropped off to 580.   A drop of oil on the sides of the transfer port o-ring showed a leak like a breaching whale.  I'm getting bored with all the gun's idiosyncrasies, I stripped the compression tube again (six bolts!) and degreased the seats for the o-ring seal with acetone.  Glued the o-ring into place with a cyanoacrylate.  With the port sealed, velocity climbed to a high of 620 with the .20 cal H&N wadcutter. Another hundred shots and the velocity has stabilized at 615.

The washer in the compression tube is certainly disrupting the airflow, not to mention the square-shaped channel of the air transfer slot transitioning to round then making that ninety degree turn inside the bolt nose.  Way too much turbulence in the original design.  So, a replacement spring seems like potentially the most bang for the buck in terms of effort.  When (if?) I strip the gun again after sourcing a different spring, I'll also try a different piston seal.  I've got four more on order.

Probably something different next time around.  Need a break from this one for a while.

Thursday, February 9, 2012

Sterling in Purgatory

With the washer epoxied into the compression tube, I turned my attention to the trigger mechanism. 


Pushed out the forward pivot pin and pulled the sear out.


Counterbore for the spring.


Removed the trigger return spring.  It's exactly the same spring used on the sear.


To remove the trigger, the safety lever must be removed first.  A very small set of external snap ring pliers is required.


Snap ring removed, and the safety's pivot and lever are pulled out.  The sheet metal safety has small indentations for the detent ball.  The ball is visible in the center of the trigger pivot pin.


Trigger pivot pin is hollow to house a small spring and ball bearing.


Like so.


Trigger/sear orientation--cocked.  Note the overlap on surfaces.  These are the locations to polish and lube to smooth the pull.


Trigger pulled, microseconds before the rifle fires.


Sear in fired position.  Aside from polishing contact surfaces, I also cut a couple coils off the trigger return spring.


I fall into the "cross hatched" category for compression tubes.  A quick pass with a Brush Research Flex-Hone finished the inside of the tube beautifully.  Inexpensive at about $20.


Thin coat of moly on the piston and sides of the seal.


Mainspring got a coat of a viscous red synthetic grease.  Added a rotation washer to the base of the spring guide and reassembled the compression tube.  No pics, it was simply a reversal of the steps here.


While the bolt was still on the bench, it seemed like a good time to clean the barrel with J-B Non-Embedding Bore Cleaner.


Thin coat of silicone grease on the bolt o-ring...


and the transfer port o-ring.


Made sure the air passage in the bolt lined up when the handle is in the closed position.


Don't forget the setscrew to lock the handle in place.


The entire upper unit needs to be assembled before attaching the compression tube.


Dropped the action back into the stock, fired off about 40 shots then set up the chronograph.  With a .20 cal H&N wadcutter, the Sterling was doing a smooth and consistent 570 fps.  Great.  I was hoping for at least another hundred fps.  Dejectedly, I removed the compression tube again and pulled the mainspring and piston.  Removed all the tacky red grease and burnished the spring with copper anti-seize.  Next, I sized the piston seal down a few more thousandths for a looser fit in the compression tube.  Reassembled and sent more shots downrange to settle things in.  Across the chrony, the rifle was again still shooting that same 570 fps.  Some of the old reference material gave specs for the .20 cal as 640 fps, so 570 seems way too slow. But, looking around, I can't find any real world .20 cal Sterling numbers to compare against.

There is perhaps still some efficiency to be gained by revisiting the transfer port and sleeving it to decrease volume and dead space.  Possibly a tighter fitting o-ring on the bolt, or a different piston seal, too. 

I'm not a velocity chaser, but find this is a bit too slow given the sheer size of the rifle.  Maybe that's why it didn't fare well in the marketplace. 

I think I'll pull the modified piston and install the original, unaltered piston from the .22 cal rifle just to get some numbers from a box stock component.  Most likely, the only real gains will come from trying some different mainsprings.

We'll see what pans out.