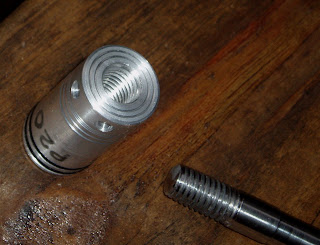
If you've read all the P17 posts here, you may remember that I modified a P17 piston with a second o-ring to fix the durability issues that the gun is known for.
At the time, I also wondered if there were any gains to be had by making the piston adjustable in length. Could the piston be adjusted to compress more air into the valve?

I'd already finished the project when I took these pics. Up top is a piece 1/2" diameter water hardening drill rod. I cut a 4.1" piece off and turned the ends flat on the Taig lathe. Next, I reduced the diameter of one end of the rod to 0.472"over 2.590". The 0.472" diameter is necessary to fit snugly in the channel on the P17's lower grip frame. Drilled a hole 3.2mm in diameter in the reduced end.

Cut 0.900" of threads on the other end 1/2" x 13 tpi. Drilled the cross pin hole, threaded for the M4 set screw and called it good. Absolute length measurement was not at all critical, but for the record, it's 4.052" OAL.

Here's a pic of the piston I started this project with.

Cut the head of the piston off the original one-piece affair. Made it 1.825" long. Length not critical. Drilled a hole part way through the piston (0.940" deep actually) and tapped a matching 1/2" x 13 female thread.

Did a couple secondary machining steps to the piston head. Spotted, then drilled 6 holes around the circumference of the piston. These holes are accessible at the bottom of the compression tube after the piston is installed. They allow a short tommy bar to be inserted into a hole and the piston head threaded up or down the steel rod changing the air volume. The grooves in the piston head are just for visual appeal. Though, in theory, the ones on the outer body may help retain lubrication. In theory...

Used a chemical etching pen and marked some o-ring info on the body for future reference. I believe that the o-rings are size #116's.

The original piston was 5.070" OAL. This one is adjustable from 5.025" to about 5.250". Way more than necessary.


These nylon ears necessitated the diameter reduction. I went for a snug fit.

Gun open for loading allows piston adjustment by using a short tommy bar. It's possible to thread the piston in so far that the gun won't close. But, at some point close to that, the piston will not retract far enough for the front o-ring to clear the air intake hole. I was hoping to show some gains of 20 or 30 feet per second. Sorry, it's not gonna happen. If I back the piston head OUT, the velocity decreases into the low 300 fps range--and the gun cocks like a dream. With the piston screwed in as far as possible based on the air intake hole, the gun is just breaking 400 fps with Beeman Silver Bear pellets. It IS possible to rap air into the valve by very sharply trying to close the top cover--then quickly re-open fully and close normally. (Watch your fingers) The velocity jumped past 450 fps on several shots--enough to say it works. Unfortunately, the amount of force required to close the top cover was clearly putting the materials and design to their limit. Looks like this simply is what it is--an inexpensive 400 fps gun.
0 comments:
Post a Comment